
# Title: The Art and Science of Polishing Cultured Stones: A Comprehensive Guide
## Introduction
Cultured stones, also known as manufactured or artificial stones, are engineered materials that mimic the appearance of natural stone while offering a range of benefits including durability, versatility, and cost-effectiveness. These stones are widely used in construction, landscaping, and interior design. Polishing cultured stones not only enhances their aesthetic appeal but also protects their surfaces, making them more resistant to stains and wear. In this article, we will explore the process of polishing cultured stones in depth, covering techniques, tools, materials, and tips for achieving the best results.
## Understanding Cultured Stones
### What are Cultured Stones?
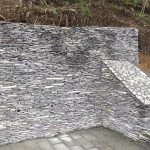
Cultured stones are made from a mixture of cement, aggregates, and pigments. They are designed to replicate the look of natural stone, such as granite, marble, or limestone, but are lighter and often easier to work with. They are used in various applications including:
- **Exterior Facades**: For homes and buildings to provide a natural stone appearance without the weight.
- **Interior Walls**: To create feature walls that add character and warmth to living spaces.
- **Landscaping**: For garden walls, pathways, and decorative stones.
### Types of Cultured Stones
There are several types of cultured stones available on the market, including:
1. **Cast Stone**: Made from a mix of cement, aggregates, and color pigments, this type is often used for architectural applications.
2. **Concrete Stone**: This is a more general term that includes various concrete-based stone products.
3. **Resin-Infused Stone**: A combination of stone aggregates and resin, providing a glossy finish and high durability.
4. **Polymer-Based Stone**: These stones are made with polymers that enhance strength and flexibility.
## The Importance of Polishing Cultured Stones
Polishing cultured stones serves multiple purposes:
1. **Aesthetic Enhancement**: Polishing brings out the colors and patterns in the stone, adding depth and vibrancy.
2. ** https://www.fs-slate.com/fs-014c/ **: A polished surface is less porous, helping to resist stains and moisture penetration.
3. **Ease of Maintenance**: Smooth surfaces are easier to clean and less likely to harbor dirt and bacteria.
4. **Longevity**: Regular polishing can extend the life of cultured stones by preventing wear and tear.
## The Polishing Process
### Preparing for Polishing
Before you begin polishing cultured stones, it's essential to prepare the surface properly.
#### 1. Cleaning the Surface
Start by thoroughly cleaning the cultured stone surface to remove dirt, dust, oils, and residues. You can use a mild detergent mixed with water and a soft sponge or cloth for this purpose. Avoid using abrasive cleaners that could scratch the surface.
#### 2. Inspecting the Surface
After cleaning, inspect the surface for any damages, such as cracks, chips, or irregularities. If you find any, consider repairing these areas before polishing. For minor chips, you can use a concrete repair compound; for larger damages, consult a professional.
### Tools and Materials Needed
To polish cultured stones effectively, you will need the following tools and materials:
- **Diamond Polishing Pads**: These are essential for grinding and polishing the surface. They come in various grits, from coarse to fine.
- **Variable Speed Polisher**: An electric polisher will help you achieve a consistent finish.
- **Water Source**: For wet polishing, you will need a water source to keep the surface cool and reduce dust.
- **Protective Gear**: Always wear safety glasses, gloves, and a dust mask to protect yourself during the polishing process.
- **Microfiber Cloths**: For cleaning and buffing the surface after polishing.
### The Polishing Steps
#### Step 1: Dry or Wet Polishing?
Decide whether you will use a dry or wet polishing method. Wet polishing is generally preferred, as it keeps the surface cool and reduces dust. However, dry polishing can be done if water is not available.
#### Step 2: Start with Coarse Grit
Begin with a coarse grit diamond polishing pad (e.g., 50 or 100 grit). Attach the pad to your polisher and start at a low speed. Work in small sections, applying even pressure and moving the polisher in a circular motion. Keep the pad flat against the surface to avoid uneven polishing.
#### Step 3: Progress to Finer Grits
Once you have achieved the desired smoothness with the coarse grit, switch to a medium grit pad (e.g., 200 or 400 grit). Repeat the polishing process, gradually increasing the speed and pressure as needed.
Continue this process, moving to finer grits (800, 1500, and finally 3000 grit) until you achieve a high-gloss finish. Each step should take several minutes, and it’s important to make sure you thoroughly polish each section before moving on to the next.
#### Step 4: Buffing
After polishing with the finest grit, you can use a polishing compound or a specific stone polish to enhance the shine. Apply a small amount of the polish to a microfiber cloth and buff the surface in circular motions until you achieve the desired luster.
#### Step 5: Final Cleaning
Once polishing is complete, clean the surface again with a damp microfiber cloth to remove any residue. Allow the stone to dry completely.
## Tips for Successful Polishing
1. **Test a Small Area First**: Before polishing the entire surface, test your technique on a small, inconspicuous area to ensure you achieve the desired result without damaging the stone.
2. **Use the Right Speed**: Adjust the speed of your polisher according to the grit you are using. Lower speeds are often better for coarse grits, while higher speeds can be used for finer grits.
3. **Keep the Surface Wet**: If wet polishing, ensure that the surface stays wet and that you are using enough water to cool the surface and prevent damage.
4. **Regular Maintenance**: To maintain the shine, consider polishing your cultured stone surfaces regularly, depending on wear and exposure to elements.
## Common Mistakes to Avoid
- **Skipping Grit Levels**: Always progress through the grit levels without skipping, as this can lead to an uneven finish.
- **Using the Wrong Pads**: Make sure you are using diamond pads specifically designed for the type of cultured stone you are polishing.
- **Overheating the Surface**: Excessive heat can damage the surface, so ensure you keep the area cool, especially during dry polishing.
## Conclusion
Polishing cultured stones is an art that combines technique, the right tools, and an understanding of the materials. With the proper preparation and approach, you can enhance the beauty and longevity of your cultured stone surfaces. Whether for home improvement, landscaping, or professional projects, mastering the polishing process will yield stunning results that showcase the elegance of cultured stones. Embrace the challenge, and enjoy the satisfaction of transforming your stones into polished works of art.
---
This guide provides a thorough overview of polishing cultured stones, discussing the importance, tools, techniques, and common pitfalls. By following the outlined steps and tips, you can achieve a professional-looking finish that highlights the unique beauty of cultured stones in your projects.